

Hướng dẫn cài đặt Odoo 18 trên ubuntu
How to install Odoo 18 on Ubuntu 24.04
This article will guide you through the installation and configuration process of Odoo 18 in an Ubuntu 24.04 system.
Prerequisites
OS: Ubuntu 24.04 with Python >= 3.10
Resources: 2-core CPU & 2GB of RAM
Access: SSH connection to the server
Permissions: a user with 'sudo' privileges
Note: you can execute all of the commands below from the root user, but for security purposes, it is recommended that you use a separate user with sudo privileges.
Step 1: Log in to the Ubuntu server via SSH as the root user:
The first step in the installation is to connect to your server via ssh. You can log in to the server using ssh.
ssh username@IP_Address -p Port_number e.g. ssh root@127.0.0.1 -p 22Step 2: Update Packages
Then let’s update existing Ubuntu packages and upgrade them to newer versions. The following commands will help you.
sudo apt-get update sudo apt-get upgrade -yStep 3: Create an Odoo user.
Create a new user called odoo18 with home directory /opt/odoo18. This prevents the security risks posed by running Odoo under the root user. You can do it with this command. You can give the user any name. However, be sure to create a PostgreSQL user with the same name.
sudo useradd -m -d /opt/odoo18 -U -r -s /bin/bash odoo18Step 4: Install Dependencies
Since Odoo is built on Python, we need to install some dependencies to install Odoo 18 on our Ubuntu 24.04 system. We can install them by running the commands below.
sudo apt install -y git python3-pip python-dev python3-dev libxml2-dev libxslt1-dev zlib1g-dev libsasl2-dev libldap2-dev build-essential libssl-dev libffi-dev libmysqlclient-dev libjpeg-dev libpq-dev libjpeg8-dev liblcms2-dev libblas-dev libatlas-base-dev sudo apt install -y npm sudo ln -s /usr/bin/nodejs /usr/bin/node sudo npm install -g less less-plugin-clean-css sudo apt-get install -y node-lessStep 5: Install and configure PostgreSQL
In this step, you need to set up the database server. Odoo uses PostgreSQL as the database back-end. Install the database server for Odoo By using the following command.
sudo apt install postgresql -yNow you need to create a PostgreSQL user for the handling of the database server i.e. PostgreSQL. In our case, we will create a PostgreSQL user with the same name as the previously created system user i.e odoo18
sudo su - postgres createuser --createdb --username postgres --no-createrole --no-superuser --pwprompt odoo18 The user and the password are needed for the conf file. Postgres uses a distinct system user to perform tasks. To switch between users, run sudo su -postgres. Next, create a database user for Odoo 18. psql ALTER USER odoo18 WITH SUPERUSER; If the user runs the aforementioned command, superuser access rights will be guaranteed. Next, log out of Postgres and PSQL. \q exitStep 6: Install Wkhtmltopdf
For printing-related purposes, Odoo 18 requires a wkhtmltopdf version higher than 0.12.2. Wkhtmltopdf is an open-source command line tool to render HTML data into PDF format using Qt webkit. To install wkhtmltopdf on your Ubuntu 24.04 server, follow the steps below.
sudo wget https://github.com/wkhtmltopdf/wkhtmltopdf/releases/download/0.12.5/wkhtmltox_0.12.5-1.bionic_amd64.deb sudo dpkg -i wkhtmltox_0.12.5-1.bionic_amd64.deb sudo apt install -fStep 7: Install Odoo
In Ubuntu 24.04, we can install Odoo from the default Ubuntu repository, but this will install Odoo version 18. In this article, we will install Odoo 18 under a python virtual environment. We created a system user earlier in this article; let’s switch to system user ‘odoo18’ and then install Odoo under that username.
sudo su - odoo18The command above should bring you to /opt/odoo18 and log you in as user ‘odoo18’. Now, download Odoo from Github.
git clone https://www.github.com/odoo/odoo --depth 1 --branch 18.0 odoo18Execute the following command to create a new python virtual environment.
python3 -m venv odoo18-venvThe virtual environment is now installed; it is time to activate it by running this command.
source odoo18-venv/bin/activateOnce executed, your shell prompt would look like this:
(odoo18-venv) odoo18@ubuntu22:~$Next, let’s install Odoo
(odoo18-venv) odoo18@ubuntu22:~$ pip3 install wheel (odoo18-venv) odoo18@ubuntu22:~$ pip3 install -r odoo18/requirements.txtOnce Odoo installation is completed, we can create a new directory to store our custom Odoo add-ons.
(odoo18-venv) odoo18@ubuntu22:~$ deactivateStep 8: Create a directory for the 3rd party addons:
We’ll create a new directory a separate directory for the 3rd party addons.
mkdir /opt/odoo18/odoo18/custom-addonsThis directory should later be added to the addons_path parameter that defines a list of directories where Odoo searches for modules. After this step, we will switch back to the sudo user using this command.
exitStep 9: Create a configuration file for the Odoo Installation
The command below allows you to create and edit a *.conf file.
sudo nano /etc/odoo18.confAdd the following configuration information to the file.
Note: Remember to change the admin_passwd to something more secure.
[options] admin_passwd = admin_passwd db_host = False db_port = False db_user = odoo18 db_password = False addons_path = /opt/odoo18/odoo18/addons,/opt/odoo18/odoo18/custom-addons xmlrpc_port = 8069Step 10: Create Odoo Systemd Unit file
In this step, we will create a systemd unit file. It is required to start/stop/restart Odoo.
sudo nano /etc/systemd/system/odoo18.servicePaste the following content into the systemd unit file above.
[Unit] Description=Odoo18 Requires=postgresql.service After=network.target postgresql.service [Service] Type=simple SyslogIdentifier=odoo18 PermissionsStartOnly=true User=odoo18 Group=odoo18 ExecStart=/opt/odoo18/odoo18-venv/bin/python3 /opt/odoo18/odoo18/odoo-bin -c /etc/odoo18.conf StandardOutput=journal+console [Install] WantedBy=multi-user.targetWith the next command, we notify systemd that the new file exists and reload the daemon.
sudo systemctl daemon-reloadNext, we start the Odoo service and enable it to run on system boot.
sudo systemctl enable --now odoo18Now we check if the service is running.
sudo systemctl status odoo18You should get the following output.
● odoo18.service - Odoo18 Loaded: loaded (/etc/systemd/system/odoo18.service; enabled; vendor preset: enabled) Active: active (running) since Tue 2024-11-11 09:56:28 UTC; 28s ago ...This next command will allow you to check on the messages logged by the odoo18 service.
sudo journalctl -u odoo18Step 11: Testing the Odoo Installation
On your browser, type: http://<your_domain_or_IP_address>:8069
If the installation was successful, you'll see the start page for Odoo 18.
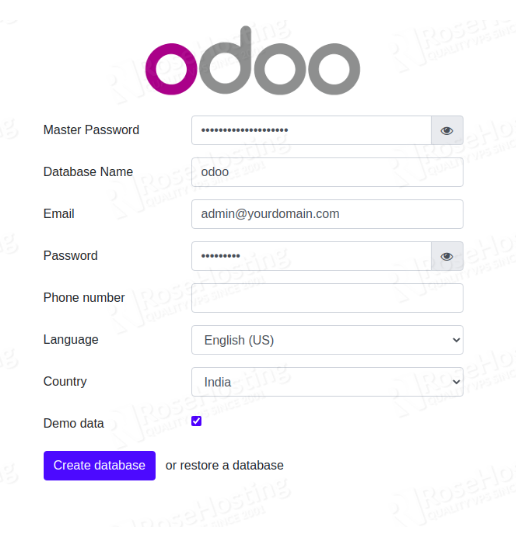
Congratulations! You have successfully installed Odoo 18 on Ubuntu 24.
trong Số hoá và Chuyển đổi số # cài đặt odoo trên ubuntu Phần mềm ERP